

Hi everyone......I am sad to say that I have decided to part ways with Close to my Heart and start a NEW adventure!! Please follow me to lifestimelessmoments.blogspot.com to see all the new things that I will be working on. I plan on posting kits, tutorials, and projects each month along with many other creations!!!
Stop by and visit me at my new location on January 1st to see my 2011 Planner featuring the Webster's Pages - Life's Portrait.
Here is some of my NEW information:
Blog: http://www.lifestimelessmoments.blogspot.com/
Etsy: LifesTimeslessMoments.etsy.com
E-mail: lifestimelessmoments@yahoo.com
Thanks and Hope to see ya soon!!
Thursday, December 30, 2010
Sunday, November 28, 2010
Craft Shows and Classes to come :)
I had an AMAZING time doing some local craft shows this fall. My first started in October and my last was this weekend. I had such a good response to all of my items that I am going to keep going at it and hope for more success to come. My goal is to be posting classes and events on my blog so, be sure to keep in touch.
Unfortunatly, I was so busy getting ready for the next show I forgot to take pictures of all the beautiful albums and items that I made. I do have some orders and plan on taking pics of them!!
My January class will be held on Saturday the 15th and we will be making a Monthly Card Planner featuring a My Minds Eye paper collection. I will have more details to come soon. Kits will be available through my etsy store.
Wednesday, October 13, 2010
Technical Difficulties & Some Paper Flowers
Hey everyone, Sorry is has been so long since I have posted! I recently was involved in 2 craft shows and our local fair so, I have been very busy. I also had some computer issues and shoud have them all worked out. But, the good news is that I have some cool projects to show you!!!!
These are some paper flowers that I sold out of at one of the craft shows: I do not remember who I learned these from but, I know that it was a video that I saw on youtube. Here is a close up of one of my favorite colors, this green is so soft and pretty!!! It reminds me of shabby chic!!!


I decided to group the colors into sets of three so that they would all coordinate together!!!
I will be starting my very first 12 days of Christmas on November 1st. featuring gift giving items for this holiday season!!!! Stay tuned for more info!!
Thursday, September 16, 2010
Jingle Card Set of 10
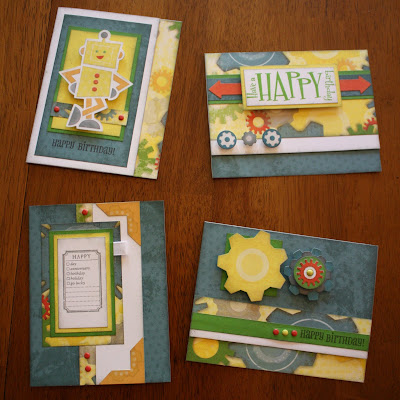
I have been working on card like crazy for our upcoming fair in town. I have to set up on Sunday so, I have been busy busy!!! This set of cards is from the Just Because Card Worshop in Wishes. This is an amazing book showing all kinds of styles of cards to create from round, to rectangles, to squares!!!
I used the Jingle Paper pack from last year. I stamped the Jingle borders using tone on tone to most of the backgrounds and random stamped the others!!

.JPG)

I used the Jingle Paper pack from last year. I stamped the Jingle borders using tone on tone to most of the backgrounds and random stamped the others!!

.JPG)

SUPPLIES USED:
Jingle Level 2 Paper Pack
Jingle Borders My Acrylix
Holiday Jingle My Acrylix
Just for the Holidays My Acrylix
Creme Brulee Ink
Tulip Ink
Desert Sand Ink
Olive Ink
White Daisy Grosgrain Ribbon
Scalloped Circle Punch
Paper Piercer
Twinkle Brads
Saturday, September 11, 2010
~ My VeRy FiRsT bLoG aWaRd ~
I was so excited this morning when I saw that I had been given a blog award!!!! This is my very first one and I hope more to come!!! I am so honored that Sonia A. thought of me when she was passing out her blog awards. You can view her blog here. Here are the rules for accepting this award:
1. Thank the person who gave it to you:
Thank you so much Sonia for considering me for this award. I can hardly sit still in my chair!!!
2. Post the award on your blog:

3. Tell everyone 3 things that you love:
I love........my beautiful girls for making me laugh everyday, my wonderful husband for giving me the opportunity to be a stay-at-home mom, and my passion for creating,
4. A Picture you LOVE:
 This photo was taken on our 1st family vacation to Sesame Place in PA. The theme/water park is based on the show Sesame Street. The girls had a blast and I think daddy had more fun than they did!!!!
5. Pass the blog on to five blogs you LOVE:
Aaron Brown - Booth #32
Karen Pedersen
Melissa Laverty - fancyMelissa
Emily Anderson - Create with Emily
Lisa Fowler - Lisa's Loft of Joy
Check out all of these wonderful blogs, they are full of crafting inspiration!!!
1. Thank the person who gave it to you:
Thank you so much Sonia for considering me for this award. I can hardly sit still in my chair!!!
2. Post the award on your blog:

3. Tell everyone 3 things that you love:
I love........my beautiful girls for making me laugh everyday, my wonderful husband for giving me the opportunity to be a stay-at-home mom, and my passion for creating,
4. A Picture you LOVE:

5. Pass the blog on to five blogs you LOVE:
Aaron Brown - Booth #32
Karen Pedersen
Melissa Laverty - fancyMelissa
Emily Anderson - Create with Emily
Lisa Fowler - Lisa's Loft of Joy
Check out all of these wonderful blogs, they are full of crafting inspiration!!!
Thursday, September 9, 2010
Zippidee Gatefold Paper Bag Mini Album :)
I had so much fun putting this Gatefold Paper Bag Album together. It is another mini album that was created by Laura Dennison from Following the Paper Trail. You can view her youtube video on how to create this album. I have included 5 paper bags for each side and featured the Zippidee Paper Pack from Close to my Heart. This paper is PEFECT for Disney or for a summer full of memories at the park or playground!!

This is the front cover of the mini album. The sides are bound with duck cloth and inked to look rough!! I used an irresistables for the "fun" label which is embossed for a shiny effect. I also cut out a star and embossed it. I then created a lollipop flower out of B&T paper with a colonial white button & sparkle!!

The mini album has 2 covers. This is the top view of how the album opens up! Each paper bag has 2 ticket-style photo mats for pictures and the smaller bag section has one also for jounrnaling.

The album holds 20 large photo mats, 10 journal spots, & 5 decorative tickets!!!

Another view of the mini album opening!!

If you have any questions, please send me an e-mail!! Thanks for looking :)


If you have any questions, please send me an e-mail!! Thanks for looking :)
Wednesday, August 25, 2010
Tinkerin Card Set of 8 - w/ Stickease :)
This is another set that I made with the Everyday Celebration template featuring the Tinkerin collection from Close to my Heart!! I didn't have the stamp set that coordinates with this paper so I used the Stickease!! Some items are raised on pop dots to give it a little dimension!!

Supplies Used
Tinkerin Level 2 Paper Pack
Tinkerin My Stickease
Grey Wool Ink
Black Ink
White Daisy Ribbon
Holiday Red Brads
Sunny Yellow Brads
Cherish the Moment - D1421
Say it in Style - D1283
A Little Everything - D1408


Supplies Used
Tinkerin Level 2 Paper Pack
Tinkerin My Stickease
Grey Wool Ink
Black Ink
White Daisy Ribbon
Holiday Red Brads
Sunny Yellow Brads
Cherish the Moment - D1421
Say it in Style - D1283
A Little Everything - D1408
Tuesday, August 24, 2010
Sunshines Mini Purse & Accessories featuring Silhouette & Sweet Leaf
I am SO excited to release this project to you. I had a blast putting this Mini Purse & Accessories together and I plan on releasing a tutorial on all items that will be featured today in the next couple of weeks.


.JPG)
Also included is a cell phone, notebook & pen, and a key ring with photo mats to feature the favorite people in your life!!!
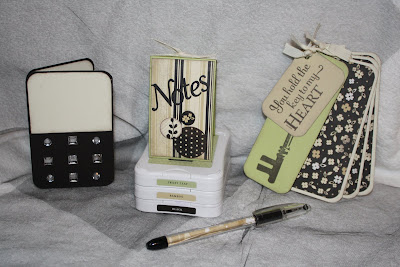

The Mini Purse contains a tri-fold wallet with credit cards, dollars, and even a checkbook!!

.JPG)
Also included is a cell phone, notebook & pen, and a key ring with photo mats to feature the favorite people in your life!!!

Thanks for looking!!!
Monday, August 23, 2010
~Sneak Peek~ Silhouette Purse & Accessories
This week I am going to feature parts of my newest creation!! Sunshines Mini Purse with Accessories!!! I was inspired by so many people on youtube and the internet that I decided to create a Mini Purse with all the accessories. All items were created by me and I will be attempting my first tutorial for this set soon!!! The purse that I am featuring this week is going to be donated to The Medina County American Red Cross for their 2nd Annual Power of the Purse event on September 23rd. This item will be available for the Silent Auction ;o) If you are in the area, check out this great event!!!

Supplies Used:
Silhouette Level 2
Sweet Leaf Cardstock
Black Ink
Silhouette My Stickease
Colonial White Ribbon
Sparkles

Silhouette Level 2
Sweet Leaf Cardstock
Black Ink
Silhouette My Stickease
Colonial White Ribbon
Sparkles
Thursday, August 19, 2010
Cherry O Birthday Cards
I am currently working hard to get a TON of things ready for our county fair this year. I am in love with the Everyday Celebration card template that was offered about a year ago. I just changed up the paper & stamps to create a beautiful set of Cherry O Birthday cards that I will be using for little girls!!

 CTMH Supplies Used:
Cherry O Level 2 Paper Pack
Chocolate Ink
Tulip Ink
Sweet Leaf Ink
Crystal Blue Ink
Colonial White Mini Medleys
Tulip Mini Medleys
Chocolate Waxy Flax
Corner Rounder
Piece of Cake - D1407
Say it in Style - D1283
Cherish the Moment - D1421
A Little Everything - D1408


Cherry O Level 2 Paper Pack
Chocolate Ink
Tulip Ink
Sweet Leaf Ink
Crystal Blue Ink
Colonial White Mini Medleys
Tulip Mini Medleys
Chocolate Waxy Flax
Corner Rounder
Piece of Cake - D1407
Say it in Style - D1283
Cherish the Moment - D1421
A Little Everything - D1408
Tuesday, June 29, 2010
Spendor Envelope Mini Album
I had a blast putting this envelope mini album together. It took me about a week to finish it. I worked on it a little each night and it came together very well. You can find the tutorial for this on Youtube by Follow the Paper Trail. I purchased my envelopes at Archivers in Chocolate and used 5 envelopes for the one that I made!


Supplies used:
Spendor Level 2 Paper Pack
Spendor My Stickease
Summer Wishes My Acrylix
Cocoa Ribbon
Colonial White Ribbon
Chocolate Eyelets
Irresistables - Pizzazz
Moonstruck Ink
Topiary Ink
Sassy Strands
Autumn Harvest Brads


Spendor Level 2 Paper Pack
Spendor My Stickease
Summer Wishes My Acrylix
Cocoa Ribbon
Colonial White Ribbon
Chocolate Eyelets
Irresistables - Pizzazz
Moonstruck Ink
Topiary Ink
Sassy Strands
Autumn Harvest Brads
Wednesday, June 23, 2010
Cherry O Paper Bag Mini Album :)
I had so much fun putting this paper bag mini album together. I found the tutorial on you tube by Follow the Paper Trail. She is an amazing designer and I have found so many great ideas from her. I am currently working on 3 more mini's that I should be showing you soon!!


The paper bag album contains 5 mini paper bags from Michael's. They are the Celebrate It brand in the smaller size. I also created the connectors to attach the paper bags together. Laura shows you how to do this in her video. The edges are all ink distressed with Chocolate. I think this would be a cute book to put pictures of our kids cooking with you in, I was also thinking about using it as a special family recipe book to give to a new bride to be!!!
I am also looking into creating some kits and selling them on my etsy store. Please stop back and check to see when they will be avaliable!!

Cover w/ ribbon & Cherry Charms

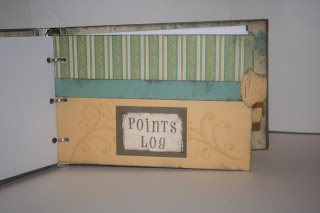
Inside Pages with Pullouts & Interactive Elements

Pull Out Photo Spot and more tags!

Some of the Pull outs & Tags
The paper bag album contains 5 mini paper bags from Michael's. They are the Celebrate It brand in the smaller size. I also created the connectors to attach the paper bags together. Laura shows you how to do this in her video. The edges are all ink distressed with Chocolate. I think this would be a cute book to put pictures of our kids cooking with you in, I was also thinking about using it as a special family recipe book to give to a new bride to be!!!
I am also looking into creating some kits and selling them on my etsy store. Please stop back and check to see when they will be avaliable!!
Tuesday, April 20, 2010
Heart 2 Heart Challenge #3 (Sketch Challenge)
I am in LOVE with the Heart 2 Heart Challenges each week!!! I had a ton of fun putting together a 5 x 5 card this week for the sketch challenge. If you would like to check it out, click here. I used the Grace Level 2 Paper Pack with the Say it in Style My Acrylix. I created the paper flower with the 1 3/4 in circle punch and the scalloped circle punch for the middle.


Side View

Flower

Thanks for looking!!!!
Tuesday, April 13, 2010
Heart 2 Heart Challenge #2 (1-2-3 Challenge)
This is the 2nd Heart 2 Heart Challenge and it is a 1-2-3 Challenge. I also used the Mojo Monday Card Sketch.
Here are the requirements:
*Use 1 stamped image (not 1 set, but 1 image)
THANK YOU SENTIMENT
*Use 2 different patterned papers
VERANDA CREATIVE BASICS & VANILLA CREAM SCRIPTS
*Use 3 embellishments - these can be 3 of the same thing or 3 different things
CREME BRULE RIBBON, COLONIAL WHITE BUTTON, COCOA INK (TO DISTRESS)

Thanks for looking!!
My Creations 3 Ring Binder with Veranda
I am in love with the 3 Ring Binder that is being created by Tresa Black. She is an amazing crafter and I have been waiting for her to post the next video on her Adore Album. You can find the beginning of the virtual class here. I copied the binder almost exactly except for the decorations on the front cover. I created 3 flowers with the Sweet Baby My Acrylix by layering some images. I held the layers together with a cocoa brad and adhered them with a pop dot.
I am using my journal for a Weight Watchers tracker. I am the type of person that likes to write things down and why not do it in a gorgous binder. I titled it "My Journey to a new ME." I have already lost 25lbs. but the real work is in the last 20. I am going to buckle down and get it done.
I used 2 dividers, 1 pocket page, and created a photo section on the back with Flip Flaps. I have been taking pictures of my progress but don't have them developed!!!

Cover


Hope you like, Thanks for looking!!!!
Friday, April 9, 2010
3 x 4 3/4 Card Set featuring Perfect Day
I was really excited when I saw the ruffles and pleats that Jeanette Lynton had on her blog. To view her ideas click here. I really liked the look and thought that I would try it out!! It was so easy to do and I love that each ruffle is unique. I used the Perfect Day collection from Close to my Heart.
Supplies Used:
Perfect Day Level 2 Paper Pack
Priceless Love My Acrylix
Chocolate Ink
Sorbet Ink
Colonial White Buttons
Cocoa Brads
DMC Floss


Supplies Used:
Perfect Day Level 2 Paper Pack
Priceless Love My Acrylix
Chocolate Ink
Sorbet Ink
Colonial White Buttons
Cocoa Brads
DMC Floss


This will be available on my etsy store early next week!!!
Thanks for looking!!!
Thursday, April 8, 2010
Buisness Card Accordian Holder Instructions
Hey Everyone, lots of you asked how I put together the accordian Buisness Card Holder. I put together a basic template for it and it can be customized to all different sizes. The measurements are as follows: 3 3/4 x 8 1/8, 2 1/4 x 4 (cut 2), 2 1/4 x 3 5/8 (cut 3).


Next score the 3 3/4 x 8 1/8 piece at 2 3/8, 2 7/8, 5 1/4, 5 3/4. Score the 2 1/4 x 4 pieces at every 1/2 in. Using a 1 3/4 in Circle punch, punch out the 1/2 circle on the 2 1/4 x 3 5/8 pieces so that they line up.

Next fold all your score lines and make sure you have a good fold.
Glue the inserts into the accordian folds like below.

Repeat with the other accordian piece.

Place glue on the outside of the insert and press firmly into the middle of the largest piece.
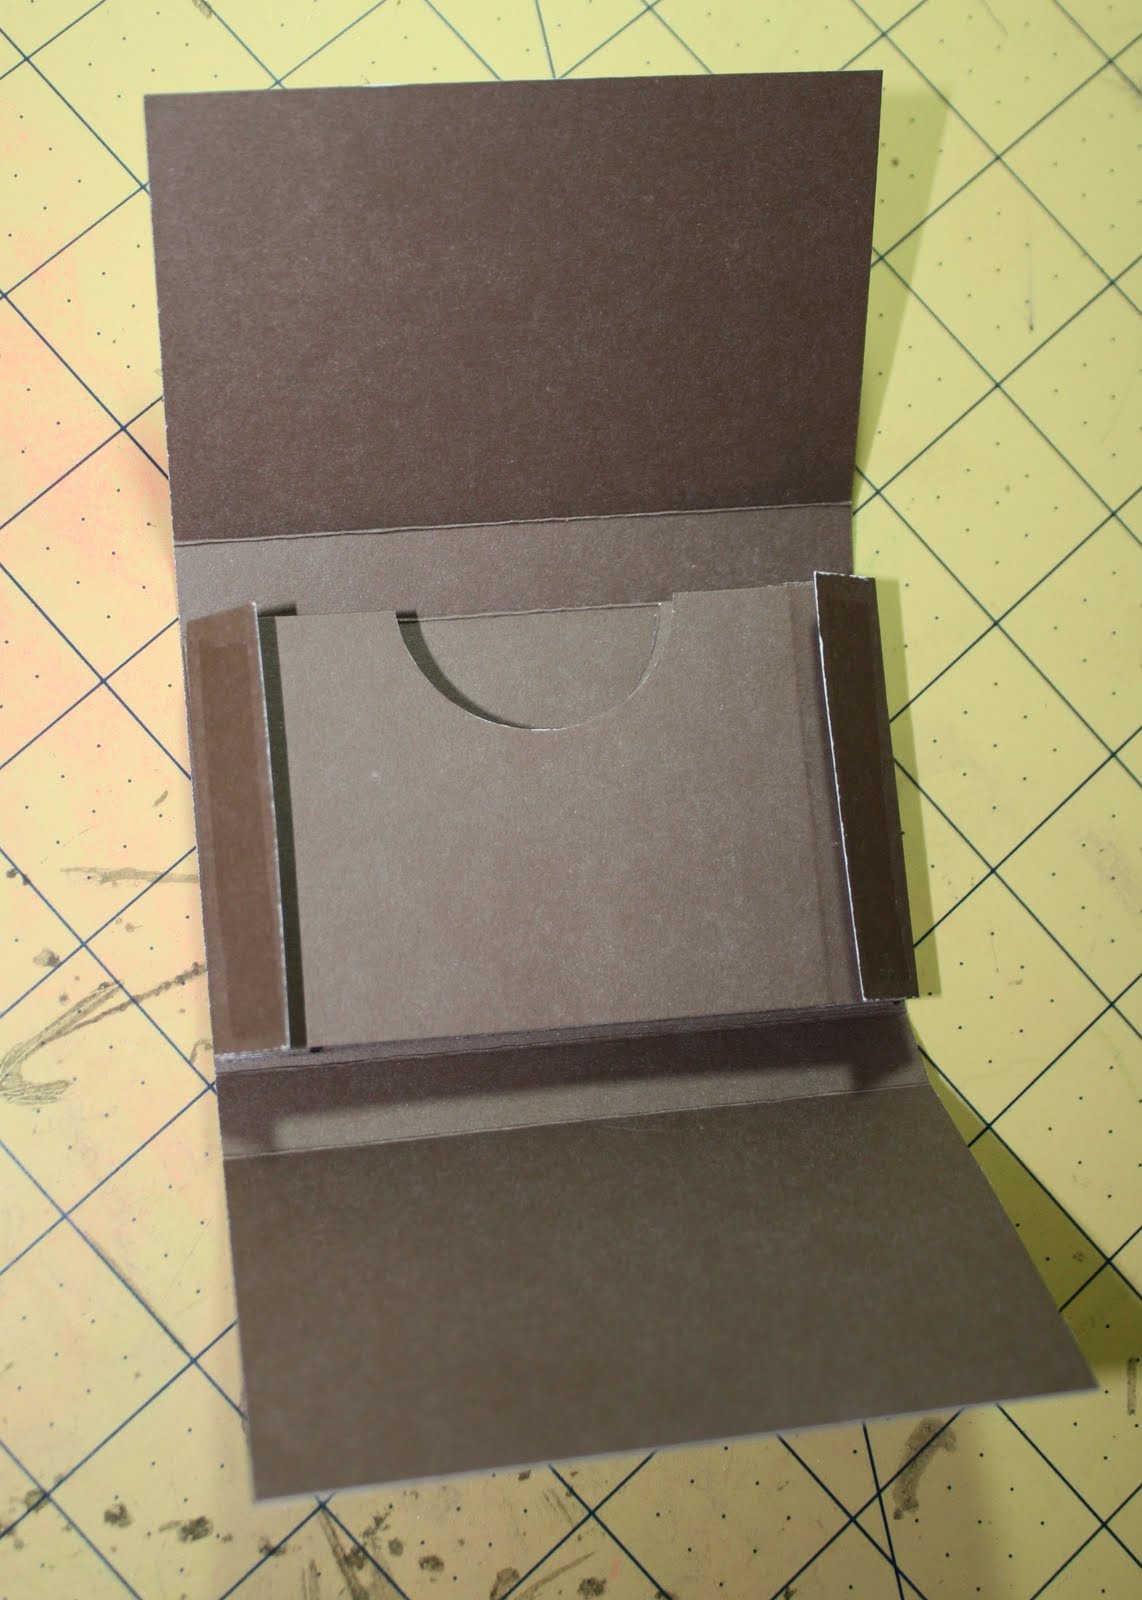
Add adhesive to the last side and adhere together.
Punch 1/2 in circle in the front of the box and embellish as desired!!!!
Wednesday, April 7, 2010
Heart 2 Heart Challenge #1 (Color Challenge)
This week was the first week for the NEW Close to my Heart Challenge Blog created by some of the CTMH Consultants!!! If you would like to check it out,Click here! They have an awesome prize this week, if you are interested in trying just submit your entry!!! I did not have all of the colors that were in the challenge but, it is ok to get a close one. I ended up with Chocolate, Honey, & Garden Green.
I created a buisness card holder and a notebook!! I also made a scalloped flower.
Supplies used:
Treasures My Acrylix
Chocolate Cardstock
Grace B & T (reverse side)
Colonial White Cardstock
Chocolate Ink
Garden Green Ink
Sparkles
Scalloped Circle Punch
1 1/2 Circle Punch


I created a buisness card holder and a notebook!! I also made a scalloped flower.
Supplies used:
Treasures My Acrylix
Chocolate Cardstock
Grace B & T (reverse side)
Colonial White Cardstock
Chocolate Ink
Garden Green Ink
Sparkles
Scalloped Circle Punch
1 1/2 Circle Punch


Thanks for Looking!!
For instructions on the Buisness Card Holder, please click here!
Subscribe to:
Posts (Atom)
